Wednesday, September 26, 2012

How to make Perfect Oatmeal


I love oatmeal. No, seriously. You can do so much to it, it is so customizable, and you can alter the consistency to adapt to your mood. Oatmeal is packed with fiber and antioxidants, can lower your bad cholesterol and chance for developing diabetes or breast cancer, boosts your immune system, stabilizes your blood sugar, and it's gluten friendly!!

So, if you are making stove top… here is how to make the best oatmeal from a Quaker box. (I’m a professional, trust me.)


Ingredients:
  • 3/4 cup oats. 
  • 1 1/2 cup water. 
  • Pinch of salt. 
  • 2 tb brown sugar
  • 1/4 tsp cinnamon
  • 1/8 tsp ground cloves
  • 1/4 tsp vanilla extract
  • 1/4 - 1/3 cup fat free milk (depending on how thick you like your oatmeal)

Put oatmeal, water, and salt in a pot on the stove and bring it to a boil. It won't take too long to boil, so keep an eye on it, and be sure to stir it every now and again. Let it boil until it hits a thick, creamy texture. At this point, drop the heat to low and add the sugar, spices, and vanilla, and stir stir stir. Then add the milk. Stir Stir Stir. Once it comes back to the thick, creamy texture, it's done and you are ready for toppings…

My boyfriend likes raisins. If you use them, (or any other dehydrated fruit) be sure to soak them in water while you make the oatmeal, then drain them before adding them in. You can also soak them in a fruit juice (or alcohol if you are that kind of person) for extra flavor. I personally like to mix mine with sweet potato, chocolate chips, or a tiny bit of peanut butter topped with sliced banana. But my favorite so far has been lightly toasted pecans and walnuts. Add as much of these toppings as you like, but go easy on the chocolate chips.. you only need a couple... they go a long way.

I have also been known to crack a little bit of fresh pepper into my oatmeal for depth of flavor… but I have found that I have a weirdly tolerant palate. Try it if you are feeling adventurous.

The spices above are completely optional, but I find them to be a really good base to any flavor profile. The milk you can add or take from, depending on how thick or runny you like your oatmeal. I happen to like mine really thick, so I don't add very much. 

If you want a higher fat version for more flavor, replace the milk with whole milk or even cream or half and half. Try adding a tsp for butter, too. =)

Happy Oatmealing!


Tuesday, September 25, 2012

Pita Sandwich


I posted a picture of my lunch a while ago on Tumblr, and so many people expressed interest in it that I did a step by step on how to make it.

See, I may be a baker, but I like to eat healthy, too. It's all about balance. I don't think you should ever eat too much of any one thing. Vary your diet, eat a little of a lot of different things, and enjoy life!


You don’t need to be a genius in the kitchen to make yourself a healthy, delicious lunch.

Ingredients:
  • One pita cut in half
  • Two tablespoon of Light Balsamic Vinaigrette divided into two metal ramicans
  • 3 pieces of nitrite and nitrate free turkey
  • 3 pieces of nitrite and nitrate free ham
  • 4 plum tomatoes, quartered
  • 1 1/2 inch of English Cucumber quartered and sliced
  • 1 oz of crumbled goat cheese
  • Handful of baby greens

STEP 1: Place meat in pita halves

STEP 2: Add tomatoes

STEP 3: Then the cheese

STEP 4: Then the cucumber

STEP 5: Lettuce

STEP 6: More tomatoes and cucumber

STEP 7: More cheese

STEP 8: 1 tablespoon dressing

STEP 9: Repeat on the other half!


That’s it! It's super easy, and super delicious. The reason I put the steps together is because if you aren't used to filling pita pockets, it can be a little confusing to get your food layered right so you can enjoy everything in every bite.
I eat mine with pretzel sticks from Trader Joe's. YUM.

ENJOY!

By the way. I use Hormel Natural Choice Deli Meats because they are all natural, have no preservatives, no nitrites, no nitrates (which both cause cancer) and can be found at just about any grocery store (I just happen to buy mine at Walmart because I'm cheap.)

I highly recommend that you give them a try!

Cook with Grapeseed Oil


Put away that EVOO, and forget about cooking with PAM.


Grapeseed oil is the way to go.

Grapeseed oil is made by cold-pressing grape seeds after they have been used to make wine. It is used in many facial and body care products, and is known for its anti aging effects.

Backed by famous chefs like Robert Irvine, Victor Scargle, and Kent Rathbun, grape seed oil is the “chef’s choice” when is comes to cooking due to it’s clean flavor profile, high smoke point, and amazing health benefits.

Grape seed oil has ZERO cholesterol and helps to lower the lipoproteins (LDL) and bad cholesterol in your blood as well as raise the high density lipoproteins (HDL) and good cholesterol.

Grape seed oil can be used in a variety of ways in the kitchen. You can use it in marinades, salad dressings, stir fries, baking, and even deep frying! Because of it’s high smoke point, grape seed oil can be raised to a higher temperature than most oils, which means less oil will be soaked up by your food. I even use it to pop my pop corn!

Grape seed oil is excellent for your circulatory system, and can also help relieve varicose and spider veins. It is also useful in helping with a number of other conditions such as;
  • premenstrual syndrome 
  • dental cavities 
  • cancer 
  • chronic venous insufficiency (damaged valves in the veins, carrying blood to the heart) 
Toss out your other commercial vegetable oils and replace them with grape seed oil.

Your body will thank you.


(This is the actual bottle I use at home. I buy mine at Sam's Club.)


Mahi Mahi Burritos


So I was going through my Tumblr and found some old food posts I'd made... so I thought I would share them here!

First on the list is Mahi Mahi burritos. B and I tend to eat a lot of Mexican food, mostly because it's easy and fast to make. These burritos are no exception.


Here is what you will need to feed three people.

Ingredients:
  • 2 Mahi mahi filets 
  • 1/2 orange bell pepper
  • 1/2 green bell pepper
  • 1/2 red onion
  • 1/2 cup sour cream
  • 1/2 lemon, juiced and zested
  • Powdered ginger (or grated fresh if you have it on hand)
  • Flour tortillas
  • Salt and Pepper
  • Grape seed oil


STEP 1: Cut veggies into small dice (about 1/4 inch squared)
STEP 2: Heat pan over med low heat with about 2 tsp grape seed oil
STEP 3: Put veggies in pan.


Don't they look pretty? I think the most important rule of cooking is to cook with color. If your food is generally brown or beige... you need to add some veggies to spice things up. I tend to make it a game for myself "how many colors of the rainbow can I get into my food?"

STEP 4: Sweat veggies.

This means allowing the vegetables to cook without caramelizing (browning) until they look like this:


Okay, they got a little brown, but not too much. The idea is to fully cook the vegetables without burning them. This should generally be done over mid to low heat, and keep them moving. When they are done, put them in a bowl until assembly.

STEP 5: Season fish

Yes, I use frozen fish. Make sure you thaw it and drain off any extra liquid first if you do, too


Just needs a little salt and pepper. Nothing too fancy. You can use come garlic powder too, if you like, or thyme would work nicely as well.

Make sure you wash the cutting board before putting anything else on it. Cross contamination = bad.

STEP 6: Put fish skin side down in hot pan (just a little under high) with a tiny big of grapeseed oil and cook until fish is opaque, then cut the fish into equal portions for the burritos.


I put the fish on some paper towel to drain off any extra oil.

STEP 7: Combine sour cream, lemon juice, and ginger.
I like to use citrus zest as often as possible. Makes it more lemony and less sour.


STEP 8: Heat tortillas.
STEP 9: Assemble burritos.


STEP 10: Roll them up, and ENJOY!


Mahi Mahi Burritos

Ingredients:
  • 2 Mahi mahi filets 
  • 1/2 orange bell pepper
  • 1/2 green bell pepper
  • 1/2 red onion
  • 1/2 cup sour cream
  • 1/2 lemon, juiced and zested
  • Powdered ginger (or grated fresh if you have it on hand)
  • Flour tortillas
  • Salt and Pepper
  • Grape seed oil
Directions:
STEP 1: Cut veggies into small dice (about 1/4 inch squared)
STEP 2: Heat pan over med low heat with about 2 tsp grape seed oil
STEP 3: Put veggies in pan.
STEP 4: Sweat veggies.
STEP 5: Season fish
STEP 6: Put fish skin side down in hot pan (just a little under high) with a tiny big of grapeseed oil and cook until fish is opaque, then cut the fish into equal portions for the burritos. 
STEP 7: Combine sour cream, lemon juice, and ginger. 
STEP 8: Heat tortillas.
STEP 9: Assemble burritos. 
STEP 10: Roll them up, and ENJOY!

Feel free to replace the fish with something else, if you don't have Mahi Mahi, or turn them into tacos, rather than burritos. You could also use any kind of pepper you want, sweet or spicy, and even toss in some cabbage if you like. That's the beauty of cooking, right? CREATIVITY!


P.S. If you make these, please tell me! This is an original, so I'd like to see how it gets adapted! 

Monday, September 24, 2012

Drunken Gummi Bears

Been too lazy to really do much lately. Kitchen being dirty makes me not want to do much either, HAHA! The beauty of this project was that there were very few dishes required. HUZZAH!

Okay. I know I do a lot of things from pinterest. But ... I just couldn't resist trying this one...

Drunken Gummi Bears from Gizmodo

                                   Courtesy of Gizmodo
Yeah.. I'm serious.

It's crazy easy, too.
Get some gummi bears, get some of your favorite alcohol (I happen to like Rum), and soak the bears in the alcohol for a about 4 days.


So the rum is for me, the vodka is for my friend C. (Vodka's gross.) Just fill up the bowl until the gummis are covered. Put them in the fridge, and wait.


So I cheated a bit, and I haven't quite gotten to the 3 days.. (it's only been about 3 hours...) But we couldn't wait and tried some anyway. 


C was pretty excited. So excited, in fact, that she ate two spoon fulls. 
We decided that was too much and that we should put them in the fridge to wait. 


They are pretty cute so far... I'll post updates in a few days! Let's see if they get bigger!!

See ya around, and ENJOY!


Wednesday, September 5, 2012

Taco Pie


 Hello Blogger Land!!

Had a long day today, though it wasn't very eventful. A teacher of mine recently received Teacher of the Year and apparently someone is making a video about her to play at the acceptance ceremony. I saw her the other day and she asked if I would be willing to be in the video...

A thank you video to my favorite teacher?
HECK YES!

So anyway.. on to the food. That's right.. no baked goodies tonight.. just some delicious savory goodness.

Tonight for dinner I was going to use some hamburger patties that I had thawed for a birthday party and make some burritos. Nothing special. Quick, easy, and would leave plenty of time for playing *cough*DDO*cough*

But then I saw this:


A friend of mine pinned it as I was about to get up to make dinner and I thought "Yeah, I can do that."

I had to change a few things, but here is how it turned out.


Ingredients:
1 pound ground beef (I used 3 hamburger patties)
Taco seasoning
3 large flour tortillas (I used the Jumbo sized ones)
Salsa Con Queso Cheese Dip (optional)
Shredded Mexican cheese blend
Refried beans (I'm easy, I used the canned stuff)

There really aren't any measurements because I don't believe in using them while cooking. In baking they are a bit necessary, but in cooking.. only for really important stuff like protein and main starch. 


Directions:
  1. Crumble and brown ground beef. Drain excess grease, add meat back to pan, then add taco seasoning and some water. Just a bit of water is necessary. 
  2. Turn off the heat and add some Salsa con Queso to the meat and mix it up. You don't need much, and the meat shouldn't be swimming in it.. just enough to bind the meat together. 
  3. Heat up your beans a little in the microwave.
  4. Grab a round pan and lay your first tortilla down. If you are using the jumbo tortillas like me, it's not exactly going to fit. Tear the edges of the tortilla from the outside inward (about an inch deep) every three inches or so, and then press the tortilla down into the pan. This will allow the tortilla edges to overlap themselves and create a bit of a crust. 
  5. Spread your beans, and half the meat (or 1/3 if you want three layers) and cover with shredded cheese. 
  6. Put the second tortilla down, tearing into it like you did the first one. Spread the beans, meat and cheese.
  7. Fold the edges of the two tortillas over the layer you just made, so it kind of looks like a Crunch Wrap Supreme from Taco Bell.  
  8. Lay down your third tortilla over the folded edges. If your pan is like mine, there wont be any more room for the tortilla to sink into the pan, so grab your kitchen shears and trim the edges of the tortilla off so it fits perfectly into the pan. 
  9. Spread a last layer of beans (meat if you want it), a little more of the salsa con queso, and sprinkle with cheese. 
  10. Bake in a 350° oven for about 15 to 20 mins. 
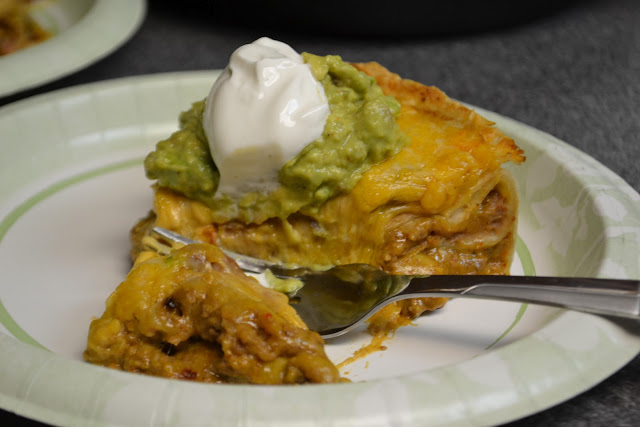
  11. Serve with guacamole and sour cream and enjoy!


Boyfriend and room mate approved. ENJOY!


Salsa Con Queso for anyone who isn't familiar with the product. 
And Thank you to The Country Cook for the original recipe. Find her here.